Sunday, June 26, 2011

The Kitchen Saga - Cabinets

In looking for cabinets, Jeff and I couldn't really agree on anything. I wanted pretty he wanted cabinets built like a tank. We priced out a few different options. Most of the cabinets we looked into were pricey, and didn't seem to be of the highest quality to fit Jeff's standards. We even looked into some sustainable cabinet options (low-VOC, made from recycled wood-fibers), but nothing really seemed to fit. We took our lunch breaks to visit various cabinet stores in the Merchandise Mart, and even got shunned from one that said our budget wasn't big enough. As we searched and searched for a perfect match, we picked up numerous books and magazines about kitchen renovation. I picked up a Chicago Home and Garden Magazine that had an ad in the front for Orchard Hill Cabinets by Builder's Cabinet Supply. I knew it would probably be out of our price-range, but the showroom was close, so we decided to go... Best decision ever!

We walked into the showroom, and the nicest sales guy started talking to us. We loved a couple different styles, and they showed us finishes that were beautiful. We soon learned that all the boxes were built in Chicago in the warehouse upstairs, and we could do all those "extra" things that Jeff wanted. We gave him the dimensions for our kitchen, and sat and waited in horror of what the price was going to be. To our surprise the quote came back as about half the price of any of the other options we had looked into. And, they were nicer cabinets. I guess that's the benefit of working directly with the cabinet company. There is no mark-up, so you get more for your money... DEAL!

We went back and forth with the samples of wood stain for awhile. But finally, we decided to go with dark cabinets as a contrast to the light wood floors. We received the cabinets, and they were beautiful.

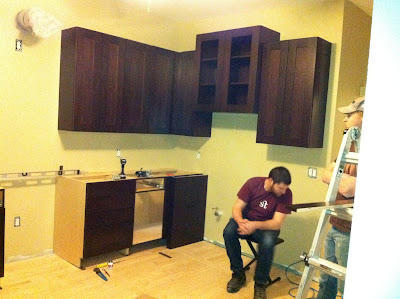
After the cabinets sat in our dinning room for about a month, we finally had everything ready to get the cabinets installed. I was so excited, and definitely did not sit this one out!

And it begins!
Surprisingly enough, hanging the cabinets was not that bad. There's a lot of measuring, and there might have been one instance where we had to redo a cabinet 3 times, but hey, all in a day's work, right? Things seemed to be moving right along.

Look how fast I move. The camera can't even keep up!
Once we were on a roll with the top cabinets, there was no stopping us. Then, it was time for the base cabinets. In doing our best with the old floor, we knew there would be quite a bit of shimming going on for these bad boys. It was pretty difficult trying to get them level.

Kevin taking a much deserved breather.
The other obstacle of the cabinets, was trying to find studs in the wall. We made graphs before we put the drywall on, and when that seemed to be failing, we even reverted back to looking at previous pictures I had taken of our progress. This system helped, but our poor walls were looking more and more like Swiss cheese.

Picture podium reference.
While I have never claimed to be great at math, I was working with two web engineers, so I thought between all of us, we could figure this stuff out. Eventually they got it, while I did what I do best... sat on the floor.

However, we did send Kevin home for the day and Jeff and I installed an amazing Rev-a-Shelf in our blind corner cabinet. We loved this accessory as soon as we saw it at the cabinet shop, but the price tag and installation price was WAY out of our budget. So, Jeff ordered one online, and we installed it ourselves. Installation was not hard at all, and it so cute and handy. We didn't love the lazy Susan (mainly because my name is Susan, and it's just plain rude to call me lazy), so this was a much better fit for us!

Rev-a-Shelf parts.

Sliding mechanism installation.

Installed! The other wire baskets slide out too. It provides an amazing amount of storage, in such a cool solution!
 One of my other best qualities is thinking about the "what if?" factor right when they boys are finished doing something, or they have something extremely heavy in their hands. Most of these moments came when trying to position and install the island. I did tons of research about how much room was needed between island, sink, cabinets, appliances, etc. But everything seemed either too far or too close. It was a bit of a three bears scenario with nothing feeling "just right."

Island in progress.
Eventually we got everything perfect, with lots of tweaking, but it really did pay off. The space is amazingly organized, and Jeff and I can be in the kitchen working, without being in each others way.

Jeff being a perfectionist.

Island cabinets installed with bead-board side panels!
We are so happy with our choice of cabinets, and the decision to install them ourselves. We were a little nervous, and had watched way too many Renovation Realities to be confident in what we were doing, but it just takes a lot of patience, a lot of math, and a great friend like Kevin to get us through. I wish everyone had a Kevin and a Jeff. They're pretty incredible. I will rent them to you for a small fee... Or pie!

Sunday, June 19, 2011

The Kitchen Saga - Walls

Drywall is not my favorite. I believe this stage of the renovation was the hardest. And, here's why.

Drywall is heavy. I could barely move it into the Kitchen, much less hold it in place.
Apparently, I am extrememly allergic to drywall dust. Even with a mask on, my alergies went ballistic!
Finding studs after the drywall is in place is harder than you would imagine. Even with diagrams, and pictures.
Mudding the edges, and screw-holes takes forever. You have to mud/sand, mud/sand, mud/sand, so many times. Plus drying in between each coat.
As you sand, drywall dust gets everywhere. We tried to block off our house, but it still crept all the way up to the attic. Everything in the house is covered :(

So, what do you think I did to conquer all of these obstacles? Yes, you got it right, I went upstairs while the boys handled most of the work. I did stay in the kitchen when they were doing things that wouldn't make my allergies go crazy, and I helped a little on mudding and sanding, but really not much. My main job function was to order lunch. And, I did that pretty well, thank you very much!

Jeff and Kevin putting up drywall.
I also had a tendency to come downstairs, and sit on the furniture dolly we bought, and scoot myself around to inspect the job the guys were doing. This prompted the nickname of "The Floorman." I really wish we had a video of this. I would go check-up on them, then scootch over to the heater grate to get warm again. My arms got a pretty good workout. I like to think I was an integral part of the process.
Mudding - See all the little holes, I did some of those.
After all the hard work with the drywall, we decided to get painters for the kitchen and breakfast room. As a reminder, our walls in the breakfast area were bright yellow, and royal blue in the kitchen.

Yellow on walls.
We wanted to go with something really neutral so our kitchen can change with us. But, I didn't want to go too bland, so we added a little color for the breakfast room.

Kitchen walls in Sherwin-Williams 6142 Macadamia
Breakfast room in Sherwin-Williams 6204 Sea Salt. All trim is in 7562 Roman Column.
We used Chicago Painters, Inc for painting, and we are so happy with the results. The painters were extremely professional, and got done a lot quicker than they estimated. They even have a 30-day touch-up guarantee. So, even if we accidentally messed up the walls, they would come and fix it for us. I highly recommend them for all your painting needs!

Thursday, March 3, 2011

The Kitchen Saga - Floors

Remember when I talked about our kitchen being like an onion? Here is the rotten layer.

Original Hardwood floors under the sink cabinets.
I really wish we could have salvaged these old wood floors, but it seemed like a lost cause. Sad, but true! Our next step was to build up the subflooring to compensate for the layers they had built on top of the original hardwoods. This was not an easy task since none of the layers were even, and I had to take the time to chisel out the glue/gunk that was under some of the tiles.

Due to my complete lack of upper body strength, this was one of those tasks that I could actually do. So, I got the pleasure of completing this one on my own. Lots of scraping and chiseling is also good for the soul. :)

The subfloor was ready to be cut and installed, after about 14 rounds of measuring, scraping/chiseling, measuring/compensating, and measuring again.

Subfloor installed!
Once we got the subfloor down, we really started talking about how the flooring should be installed. Since the last people who installed the hardwoods did not want to take out the cabinets, the wood floors cut off at the toe-kick. So, we decided to cut this in a straight line, and add a wider board running perpendicular to the other boards.

Kevin cutting the existing hardwood floor.
 
Measuring the board before install.


We thought this would help with the fact that all the boards would end in a straight line, so this way it looks a little more intentional. I'm pretty sure we could get a job with HGTV!

Going back to my lack of upper-arm strength... Jeff and Kevin got to use the fun floor staple gun thing. I apparently could not combine the precision to hit the rubber trigger with a hammer, hold the gun with my other arm and foot, and not giggle. Plus, one time I missed the target all together and almost hit myself in the shin. Jeff was an expert immediately though.

It looks easier than it is. Don't judge me :)
But, the good thing about flooring is that there is plenty to do besides using the mean staple gun thingy. I got to use the miter saw to cut down all the pieces of wood. YAY!

Using a miter saw for lots of wood!
Another fun task I was delegated was pulling out all the carpet and staples/nails under the stairs where we wanted to finish out the wood floors. This was another "alone" job. During this one I found out that Penelope was not the only small, furry creature living in our house. At some point we had rats. And, they lived under our stairs. I vacuumed many rat terds (sorry Mom) from the carpet before ripping it out, but I did not get them all. And, practically all the ones that I didn't get, would shoot off of the carpet and into my face or hair as I was pulling it from the floor. Double gross. Yanking out staples from the floor was not much fun either, but it least it wasn't rat poop flying at me from all directions.

The good news is that we have patched all rat holes, and there are no more "remnants" left behind. So, hopefully we will NEVER have a rat problem again.

The other good news is that instead of gross, old, rat infested carpet, we have beautiful hardwood floors under our back stairs.

New maple under the stairs.
Now, we get into the good stuff. After all the floors were installed, we wanted everything to be refinished so that the color/stain would be consistent.

New floor verses old floor.
As you can see, we needed the floors refinished badly. We were going to do this ourselves, but after pricing out all the equipment and getting a few quotes, it was well worth it to hire professionals for this one. We went with ADC Floors who did a fantastic job, and were super flexible with their schedules. They have amazing reviews on yelp, and they come highly recommended from me. Check out their website at http://www.adcfloors.net/.

ADC Floors also use Bona brand stains and finishes, which is what Jeff wanted to use. And, they even let us pick out the Bona Traffic product because Jeff HAD to have this specific floor finish. If you want to check it out, feel free; http://www.bona.com/en-gb/United-States/TopMenu/BonaSystem/Coatings/Finishes/BonaTraffic/.

Now that I have given all my shout-outs, we are ready for the big reveal!

Refinished Maple floor in Bona Traffic Satin
If you haven't gotten this yet, I couldn't be happier. When I walk in my kitchen it feels like a ballet studio. Once or twice I rubbed my face on the floor. It's true love.

Friday, February 25, 2011

The Kitchen Saga - An Unexpectedly Amazing Fieldtrip

With all the construction garbage we had accumulated during our "little" renovation. We knew we would have to do something about all the trash. Renting a dumpster in Chicago is probably one of the biggest rackets of all time, so we decided we would rent a U-Haul and take a trip to the dump.

I was already not looking forward to this, as I had to wake-up extremely early, deal with U-Haul (not one of my favorite things in the world), and throw trash into a smelly pile. And to top it off, Jeff would not stop and let me get Starbucks. Most of you who know me, know exactly how whiny I can be when I don't get my way. I believe the conversation went something like this. (Imagine a five year old's voice whenever you see "Bethanie").

Bethanie: Please can we stop
Jeff: No, we are running late as it is
Bethanie: But, I'm sleepy. And, you have made me come to the stupid U-Haul, and they are going to be mean to us. They won't have the dumb truck size we need, and it's cold out. Please.
Jeff: We don't have time. Can we pick something up for you later?
Bethanie: I NEED it.
Jeff: Please stop whining.
Bethanie: Why do you always have to ruin my life?

Okay, so it probably wasn't as bad as that. But, my intolerance for early mornings without Starbucks has kind of gotten out of control.

When we pull up to the U-Haul Fortress, I promptly tell Jeff that he needs to deal with "these people" because I just couldn't handle it. We are greeted by a smile and cheery attitude that completely threw me off guard. This was U-Haul right? Yes, it was. And, the lady helping us out was amazing. So nice, and thorough, and they had our truck waiting for us. It's almost like U-Haul was a fully functioning, nation-wide company, that actually cared about customer service. I will never rent a truck from anywhere else.

Despite our good luck with U-Haul, I was still determined to be cranky. Jeff didn't want to leave our car at U-Haul, so he made me follow him home, and find parking on the street. He then forgot I was following, and lost me, and I couldn't figure out where I was for about 30 seconds. This brought on a full-blown tantrum to myself. I finally figured out where I was, and started heading towards home. I knew there wasn't going to be ANY parking available, so I started grumbling to myself again. I pulled up right in front of our house and parked. I don't think anyone was parked on our street.

We started loading the truck with all our junk, and I became aware that I was too weak to carry any of the trash from the kitchen to the truck. So, the boys allowed me to stand in the truck, and they handed me stuff to load. It didn't take THAT long, but it was awfully tiring.

On the way to the dump, my life looked like doom and gloom city. I knew this was going to be awful. We pulled in, and there was mass confusion. We had no idea where to go, no one would help us, and then we asked someone for help, and they told us what to do. We weighed our truck on a scale, then pulled around back to the "pile." My eyes lit up like a Christmas tree!

The pile was massive. And, there was trash everywhere. I don't know what I was expecting, but not this. As we opened the door, the smell nearly knocked us down. But then we started "unloading." This was the first time in the kitchen renovation that I could actually let go, and literally THROW all my cares away. I was taking those gross old cabinet doors, and tossing them into a pile of garbage the size of Wrigley Field. It was amazing. Completely cathartic, and super fast.

Amazing Pile O' Trash
 I got so excited when the workers started climbing over the trash with their backho. I think I might want to do this a couple times a year. I never thought this could be so fun. So, later that night we hung out with some of our friends. I'm pretty sure I told all of them how amazing my day was, but I still don't think they realize how magical the dump REALLY is. Maybe I will have my next birthday party there.

If you are curious about this magical place, check out their website at http://www.recyclingsystemsinc.com/

Apparently this is a Backho. I had to go to the "man cave" at work to ask.

P.S. We also went to a metal recycling place that scared me to death. I stayed in the car, and Jeff made $150 off the metal junk we pulled out of our walls. Pretty cool... still scary.

Bye-Bye gross, stained, yucky, old cabinets!

Tuesday, February 22, 2011

The Kitchen Saga - Nubbins!

Okay, this post is a bit ridiculous, but I love my faucet.

Delta Victorian Kitchen Faucet with Soap Dispenser in Brilliance Stainless.

If you are as super-excited about the faucet as I am, you can go to the Delta website and watch a video about it. Which I am sure no one will do but me.
http://www.deltafaucets.com/kitchen/collection/victorian.html

If you don't want to watch the video, I can give you a little synopsis. It's pretty and Victorian looking, but still modern. It has Diamond-Seal Technology, which means it won't tarnish. The spray head locks into the fixture with magnets, and there is a spray feature and stream feature. Pretty standard faucet stuff. :)

However, the most exciting feature about the faucet is that it has easy one-touch clean nubbins. Apparently you can clean the head of the faucets by rubbing your finger over them. I don't care much about that, but they are called nubbins. Nubbins... so fun to say.

Nubbins!

Sunday, February 20, 2011

The Kitchen Saga - The Coldest Day of Our Lives

To make more cabinet space, we decided months ago that we were going to replace the kitchen window, with a new shorter window. Since we are trying to look out for our planet, we are dedicated to searching for more eco-friendly options. This is all well and good, but takes us a little longer when planning, purchasing, ordering and receiving our products. Long story short, we got the window and it is the middle of Winter, in Chicago.


We awoke extremely early, to make sure we could get everything completed by night-fall. I did not want to be taking shifts guarding a hole in our house, so we planned that out well! 


Jeff and Kevin assessing the old window and creating a game-plan for the day.

We got all the wood ready, and took out the existing window. My, oh my, was it cold!
Jeff and Kevin hurried to get the space framed for the new window, and before long we were ready to install. 


My failed attempt at toe-screwing. I was promptly fired, and the professionals took over again.

Since I was fired from framing, my job during the install was to stand on a ladder on the outside of the house and make sure the new window didn’t come crashing down. The bad part about this was that somehow the side of our house has turned into a cold-trapping, wind-swept, ice tunnel. Being on a metal ladder doesn’t help. But, I stayed out there to ensure the safety of our new window.


YAY! Our new window was in. However, there was a gaping hole beneath the window where the framing was. Oops, we forgot to get plywood to cover that up. We took a quick trip to home depot, and bought some plywood to attach to the side of our house. This time I was staying inside! We measured the hole, measured the plywood, and Kevin and Jeff went outside. I fed the plywood through the window, and “OH, SNAP!”, It didn’t fit. So, we re-cut, and tried again. “DOUBLE SNAP!”, no luck. And, again. Finally, we got the stupid piece of plywood on the house, and all was warm again.

Jeff and I made a fun foam sculpture to insulate the window. If you haven’t tried the insulating spray foamy nonsense called “Great Stuff,” you should. Just be careful. Wear gloves and goggles and be outside. But, it is kind of the conglomerate of silly string, cheese whiz, and that plaster they put in your mouth at the orthodontist. Plus, it’s the color of Spongebob! Gross, and AMAZING!

We haven’t patched outside as much a we would like, but from the inside it looks pretty good. And, even though it was the coldest day of our lives, all-in-all we did pretty good!


Beautiful new window :)